Discover essential tips for using a curling iron effectively and safely. Learn how to achieve beautiful curls or waves, including choosing the right barrel size, adjusting temperature settings, sectioning your hair, and mastering the curling technique. Find out how to protect your hair from heat damage, alternate curling directions for a natural look, and allow your curls to set properly. With these expert tips, you’ll be able to create stunning hairstyles with confidence using your curling iron.
Start with dry hair
It’s important to begin with dry hair when using a curling iron. Wet or damp hair can lead to uneven curls and may cause damage due to the heat. If your hair is slightly damp, ensure it’s thoroughly dried before using the curling iron.
Apply heat protectant
Before using any heat styling tool, it’s beneficial to apply a heat protectant product to your hair. Heat protectants form a barrier on the hair shaft, reducing the impact of high temperatures and minimizing damage. Spray or apply the product evenly throughout your hair, focusing on the ends and any areas prone to dryness or damage.
Section your hair
Divide your hair into manageable sections. Start by clipping the upper part of your hair away and begin curling the lower sections first. This ensures that you can work with smaller portions of hair at a time, allowing for better control and more consistent curls.
Choose the appropriate barrel size
Curling irons come in various barrel sizes, typically ranging from 0.5 inches to 2 inches in diameter. The size of the barrel determines the tightness or looseness of the curls. Smaller barrels create tighter curls, while larger barrels produce looser waves. Consider the look you want to achieve and choose the barrel size accordingly.
Adjust the temperature
Most curling irons have adjustable temperature settings to suit different hair types and textures. Fine or damaged hair generally requires lower heat settings, while thicker or coarser hair may need higher temperatures to hold the curls. It’s advisable to start with a lower temperature and gradually increase if needed. Consult the manufacturer’s guidelines for recommended temperature ranges.
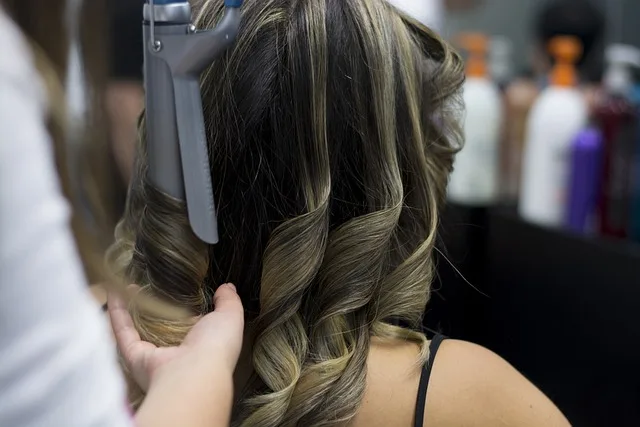
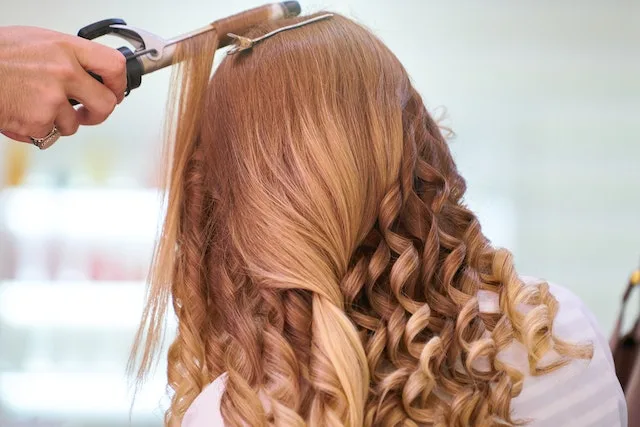
Wrap the hair around the barrel
Take a small section of hair, about 1 inch wide, and hold it taut. Begin wrapping the hair around the barrel, starting from the base and working towards the ends. Keep the ends of your hair secured between the clamp or clip if your curling iron has one. Alternatively, you can wrap the hair around the barrel without using the clamp for a more natural-looking curl.
Be mindful of the curling direction
To achieve a more natural and voluminous look, alternate the direction of the curls. Some curls can be wrapped towards your face, while others away from your face. This adds dimension and prevents the curls from blending together.
Control the curling time
The duration you leave your hair wrapped around the curling iron depends on your hair type, the desired curl, and the heat setting. Generally, it’s recommended to hold the hair around the barrel for about 5-10 seconds. Thicker hair may require a slightly longer time, while finer hair may need less time. Experiment with different timing to find what works best for your hair.
Release the curl gently
After holding the hair around the barrel for the desired time, release the curl gently. Avoid pulling or tugging on the hair, as it can lead to frizz or loss of shape. Let the curl slide off the barrel naturally, and hold the curl in your hand for a few seconds to help it set.
Repeat and vary
Continue curling small sections of your hair, working your way up from the bottom to the top. Take your time and ensure each section is evenly heated and curled. Remember to alternate the direction of the curls to achieve a more natural and effortless look.
Allow the curls to cool and set
Once you’ve finished curling your hair, allow the curls to cool completely before styling or running your fingers through them. This helps the curls set and last longer. Avoid touching or manipulating the curls too much while they’re cooling, as it can disrupt the shape.
Use hairspray for hold
If you want the curls to hold for an extended period, you can apply a light hairspray once the curls have cooled. Hold the hairspray about 12 inches away from your head and lightly mist it over the curls. This helps to set the style and provides some hold without making the hair stiff or crunchy.
Remember to always follow the instructions provided by the manufacturer of your specific curling iron model, as different irons may have unique features or requirements. Additionally, practicing caution while using hot styling tools is essential to prevent burns or damage to your hair.
Here are some key features and aspects of curly irons
Barrel size
Curling irons come in different barrel sizes, which determine the tightness or looseness of the curls. Smaller barrels create tighter curls, while larger barrels produce looser waves.
Temperature control
Most curling irons have adjustable temperature settings to accommodate different hair types and textures. It’s important to use the appropriate heat setting to avoid damaging your hair.
Material
Curling irons can be made of various materials, including ceramic, tourmaline, titanium, or a combination of these. Ceramic and tourmaline barrels provide even heat distribution and help reduce frizz, while titanium barrels heat up quickly and are durable.
Safety features
Many modern curling irons come with safety features such as automatic shut-off timers to prevent accidents if left unattended. Some models also have heat-resistant tips or gloves to protect your hands from burns.
Remember, practice makes perfect when it comes to curling your hair with a curling iron. Experiment with different techniques, barrel sizes, and heat settings to find the approach that works best for your hair type and desired style. And always prioritize the health and safety of your hair by using heat protectant products and avoiding excessive heat exposure.